Settings
The Settings page is where you configure AI provider accounts, define model profiles, build fallback chains, and connect external integrations. All per-user and per-organization AI configuration lives here.
Accessing settings
Open the user menu
Click the user button at the bottom-left of the sidebar. The user dropdown menu appears above the button.
Click Settings
Click the Settings item (gear icon) in the dropdown. It highlights in blue on hover.
Settings navigates to /settings.
Settings tabs
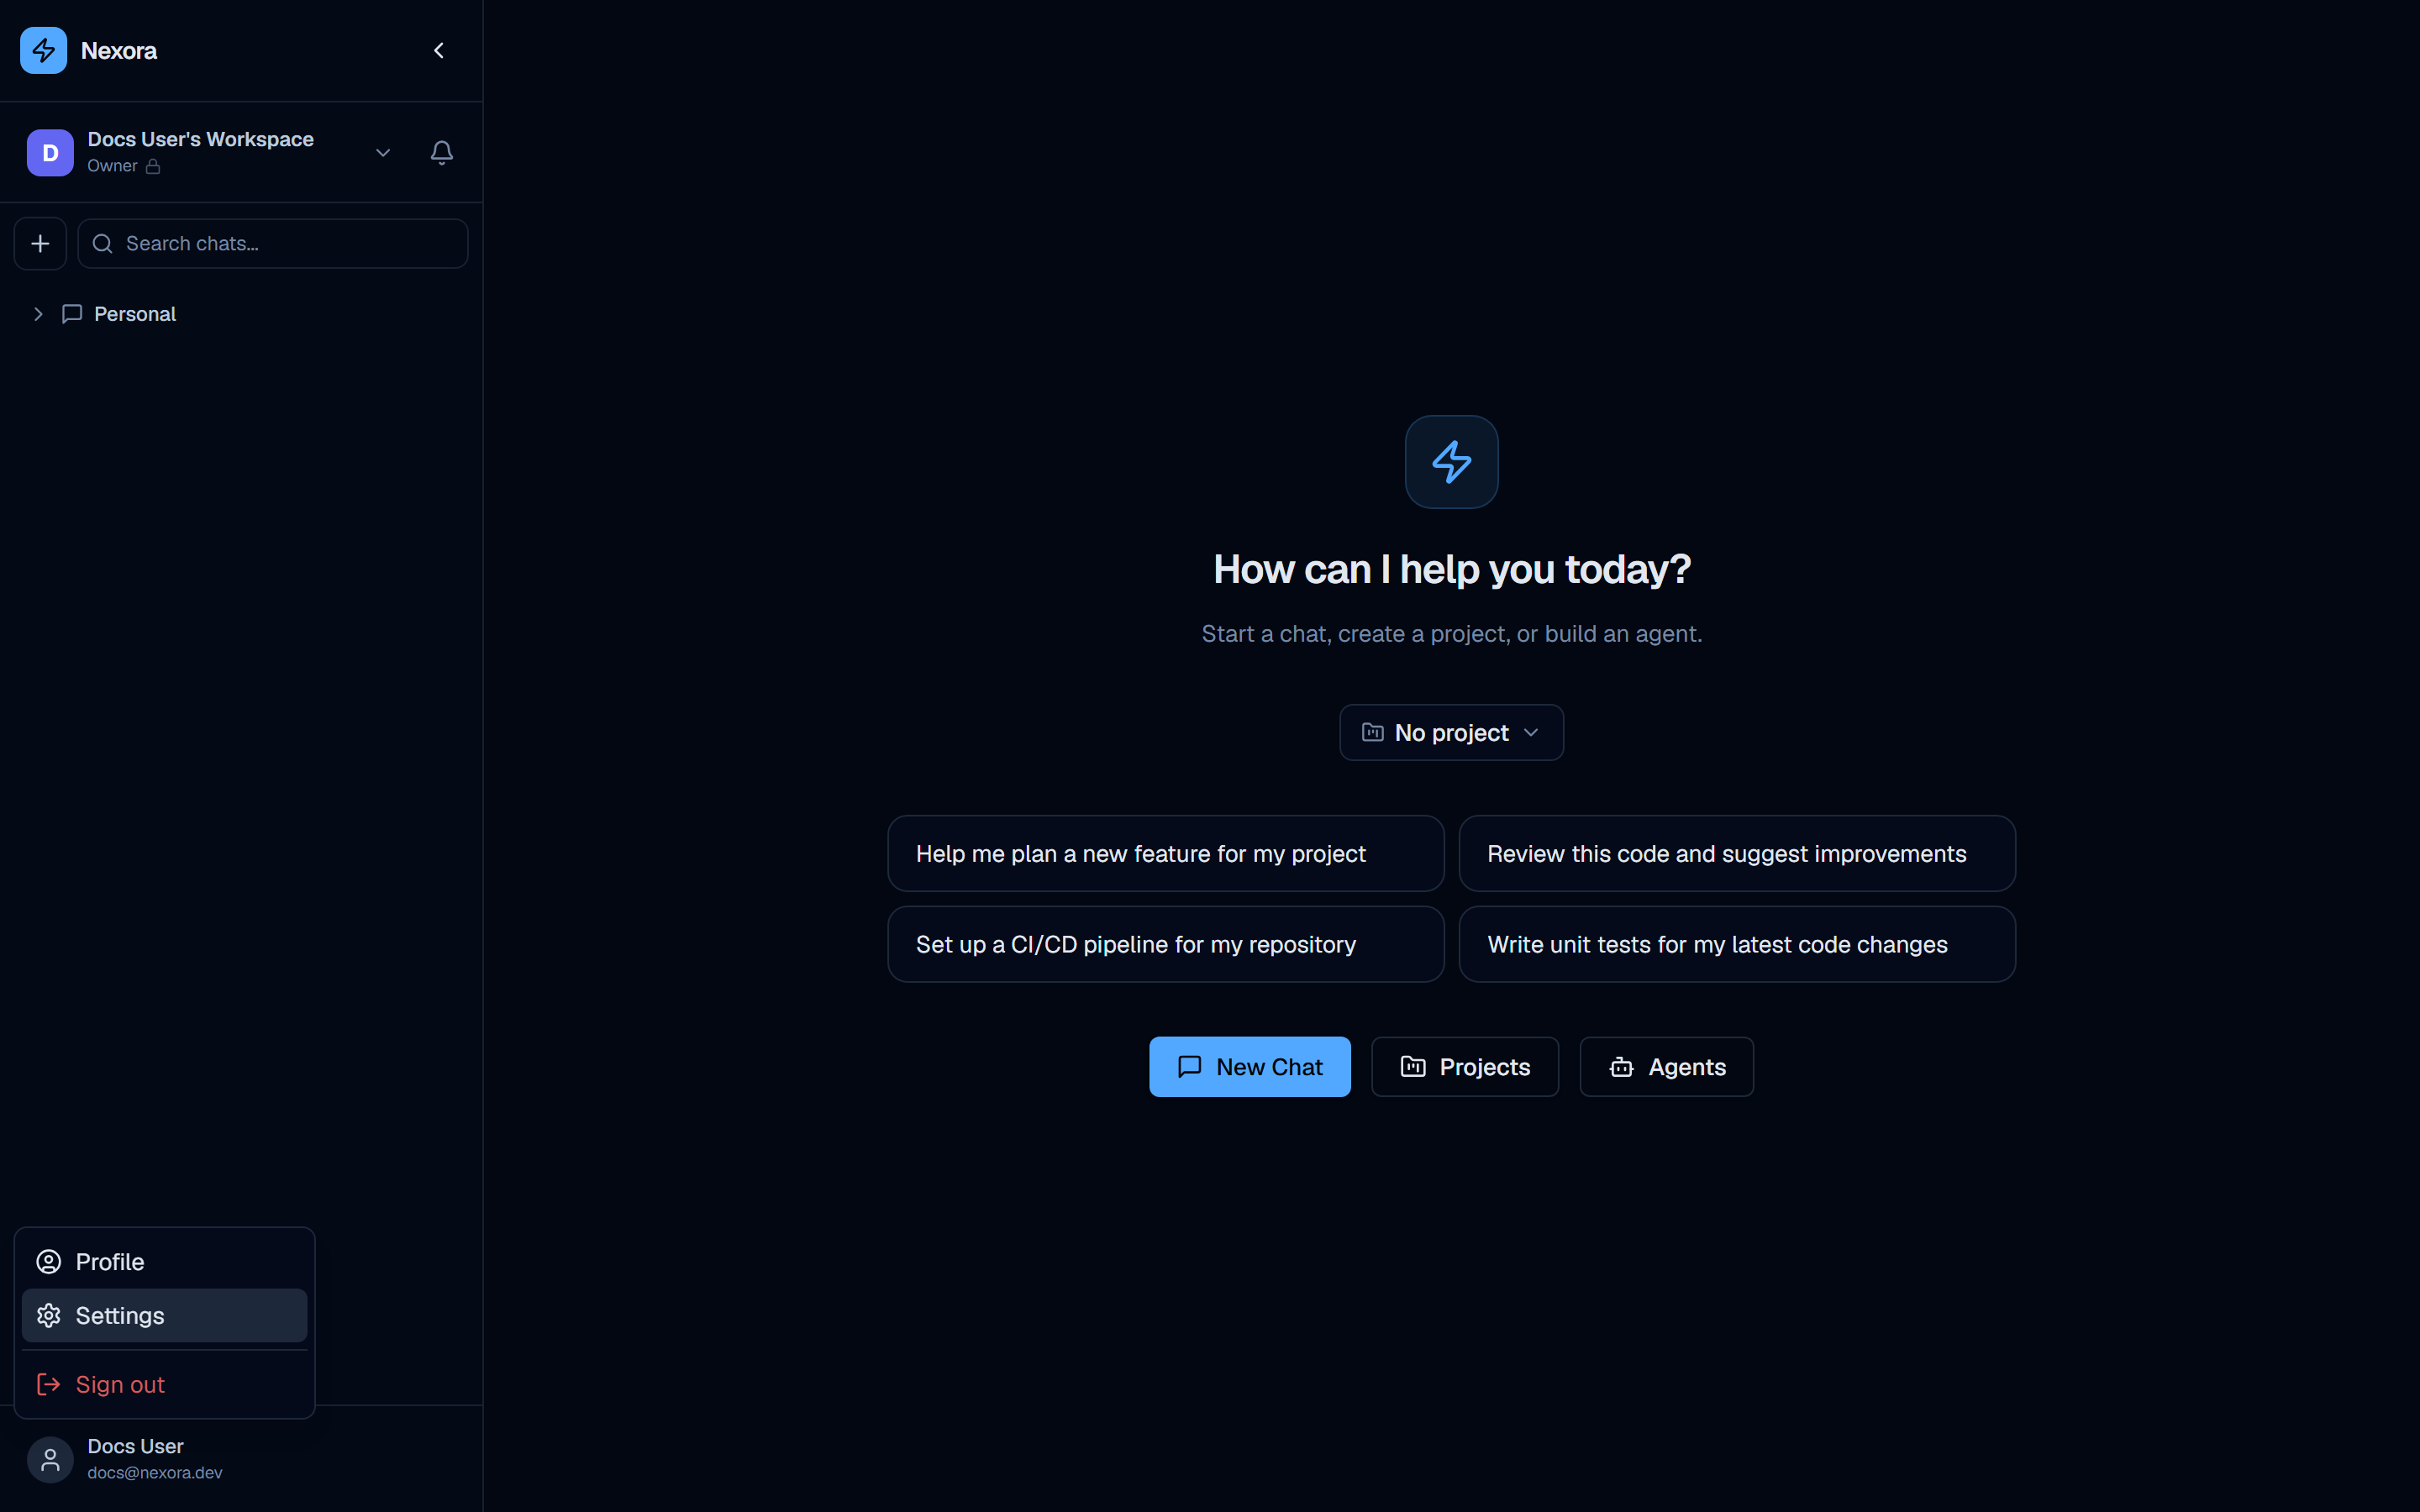
The Settings page has 6 tabs across the top. The default tab when first opening Settings is Usage.
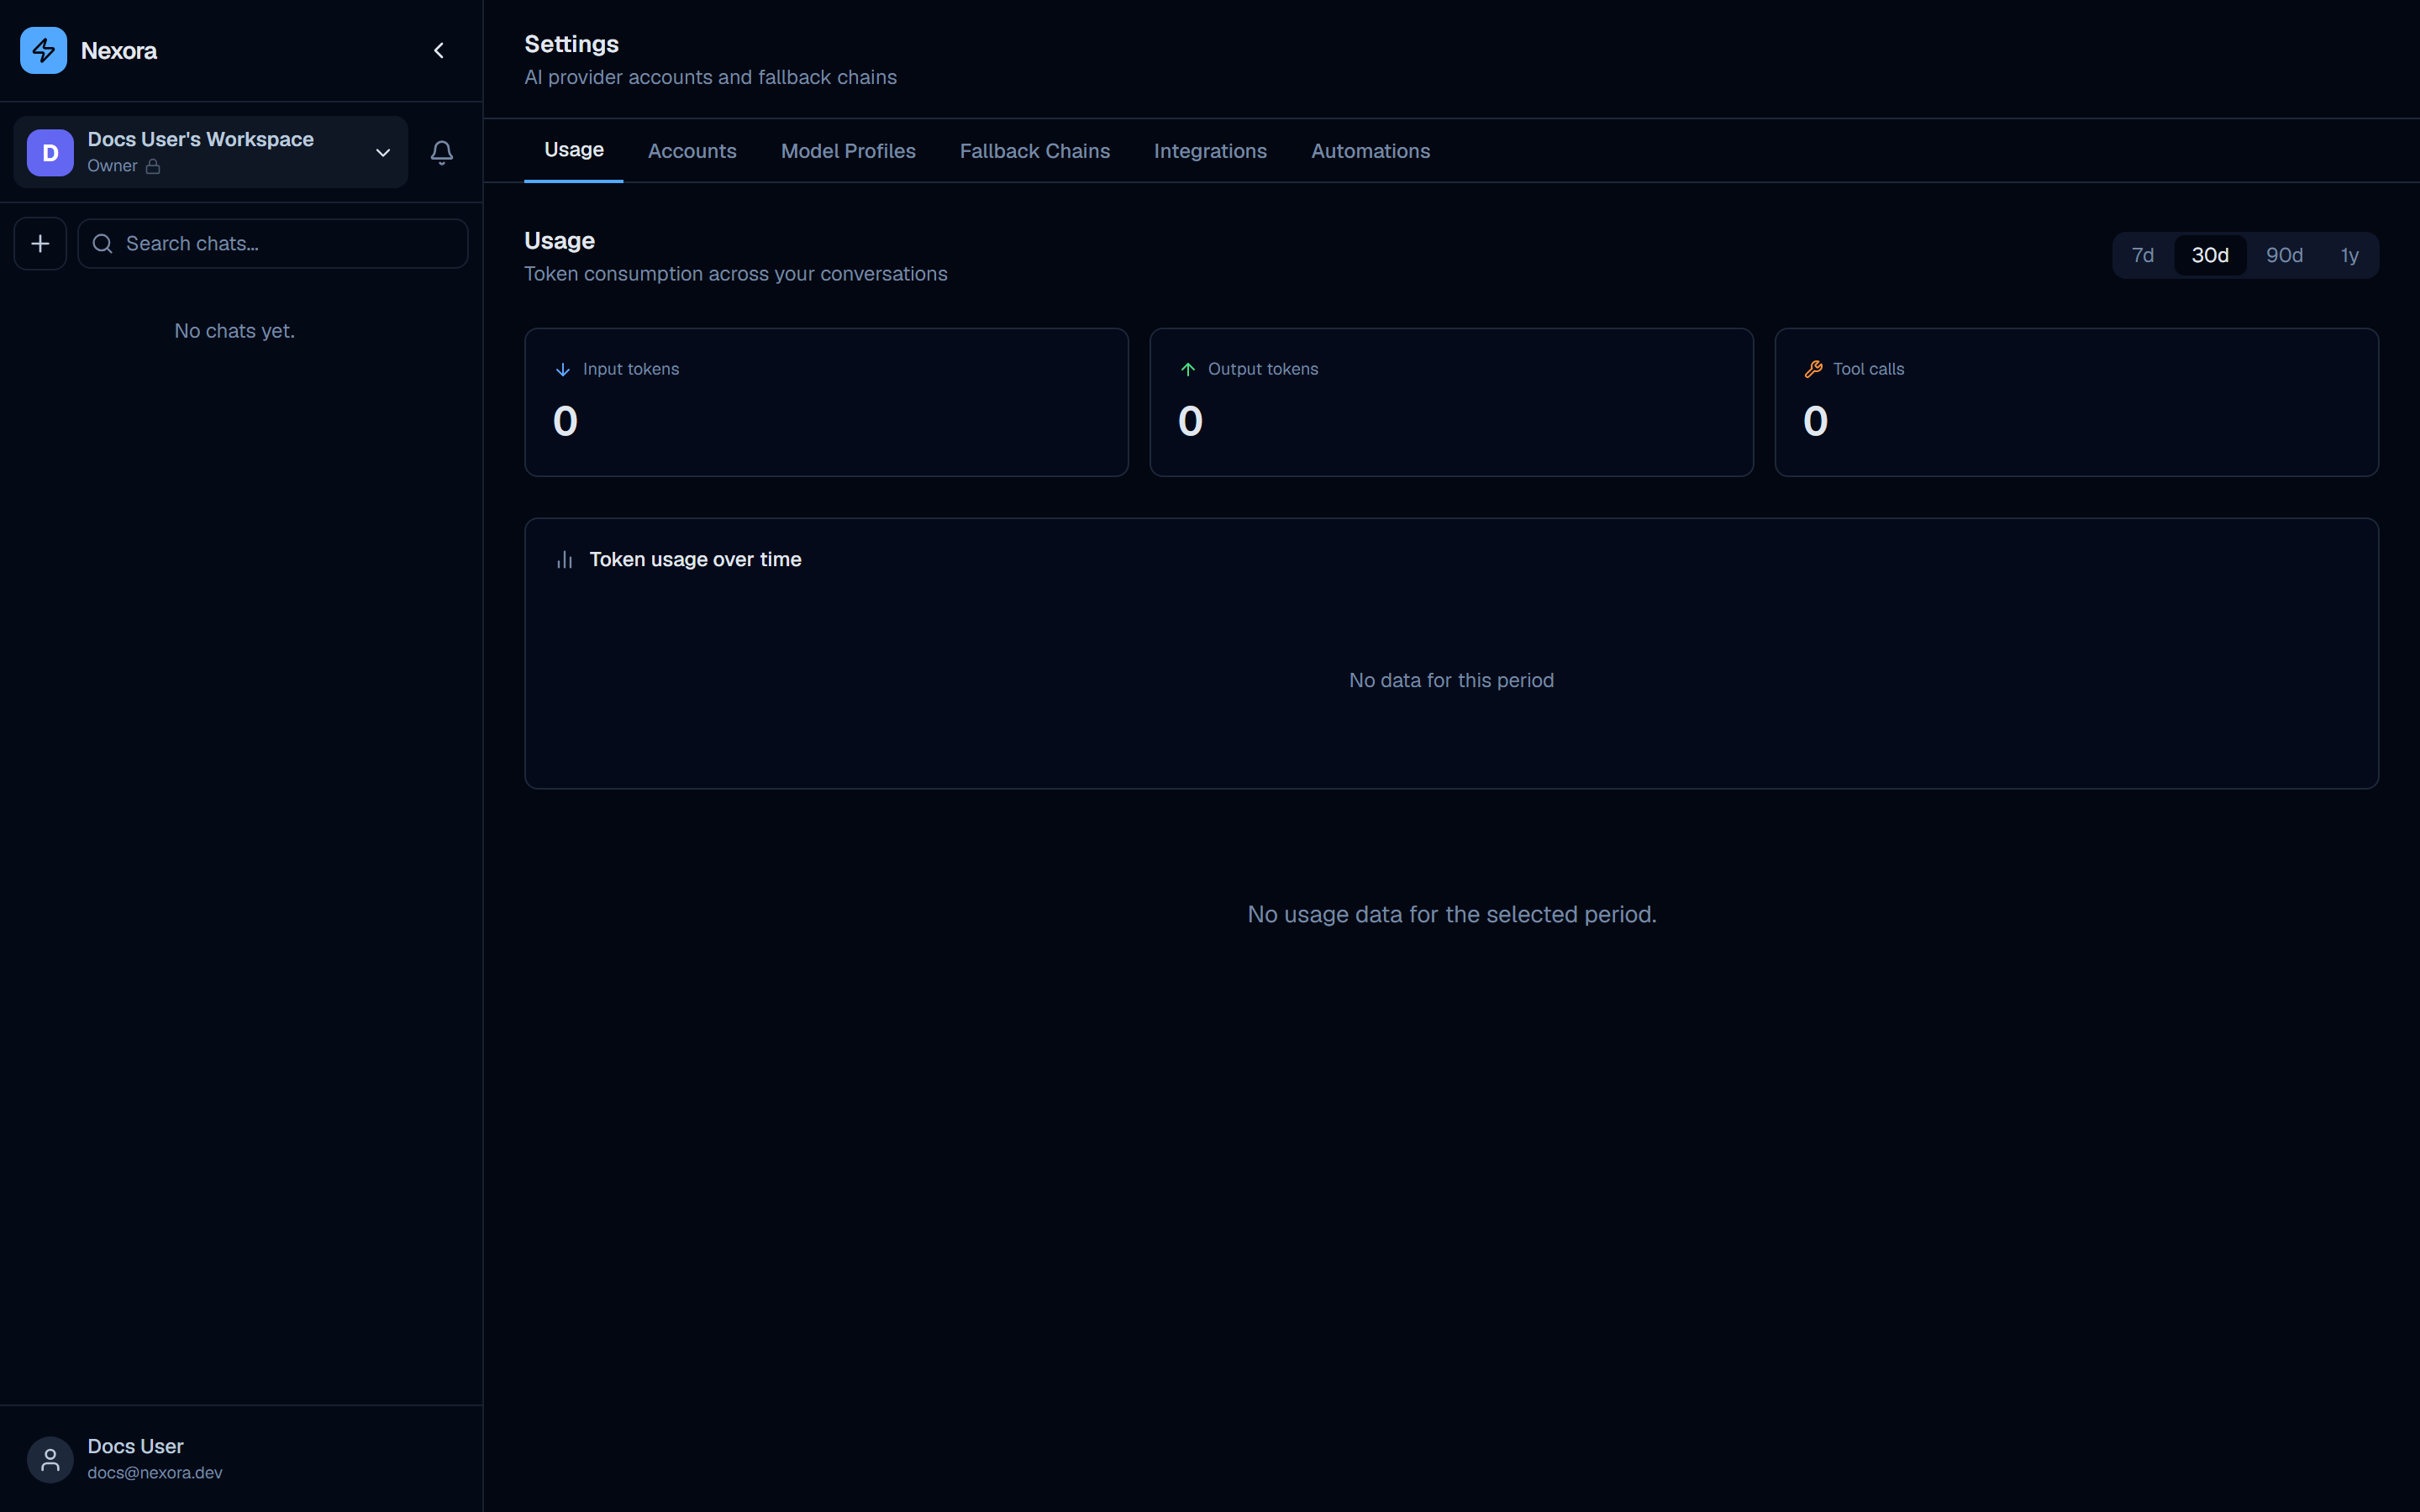
Usage tab
The Usage tab gives a high-level view of AI consumption across the current organization for a selected time period.
Period selector
Four buttons let you select the time window for the stats:
| Button | Period |
|---|---|
| 7d | Last 7 days |
| 30d | Last 30 days |
| 90d | Last 90 days |
| 1y | Last 12 months |
Stat cards
Three stat cards display aggregate totals for the selected period:
| Card | Icon | Description |
|---|---|---|
| Input tokens | Input icon | Total tokens sent to LLM providers |
| Output tokens | Output icon | Total tokens generated by LLM providers |
| Tool calls | Tool icon | Total number of tool invocations by agents |
Usage chart
Below the stat cards, a “Token usage over time” chart renders a time-series graph of token consumption for the selected period. The chart uses bars or a line plot depending on the granularity of the selected window.
Empty states:
- No data at all: “No data for this period”
- Chart area with no data points: “No usage data for the selected period.”
Usage data is available for Claude, Gemini, and OpenAI-compatible providers. Providers that do not return usage metadata in their stream responses will not contribute to these counts.
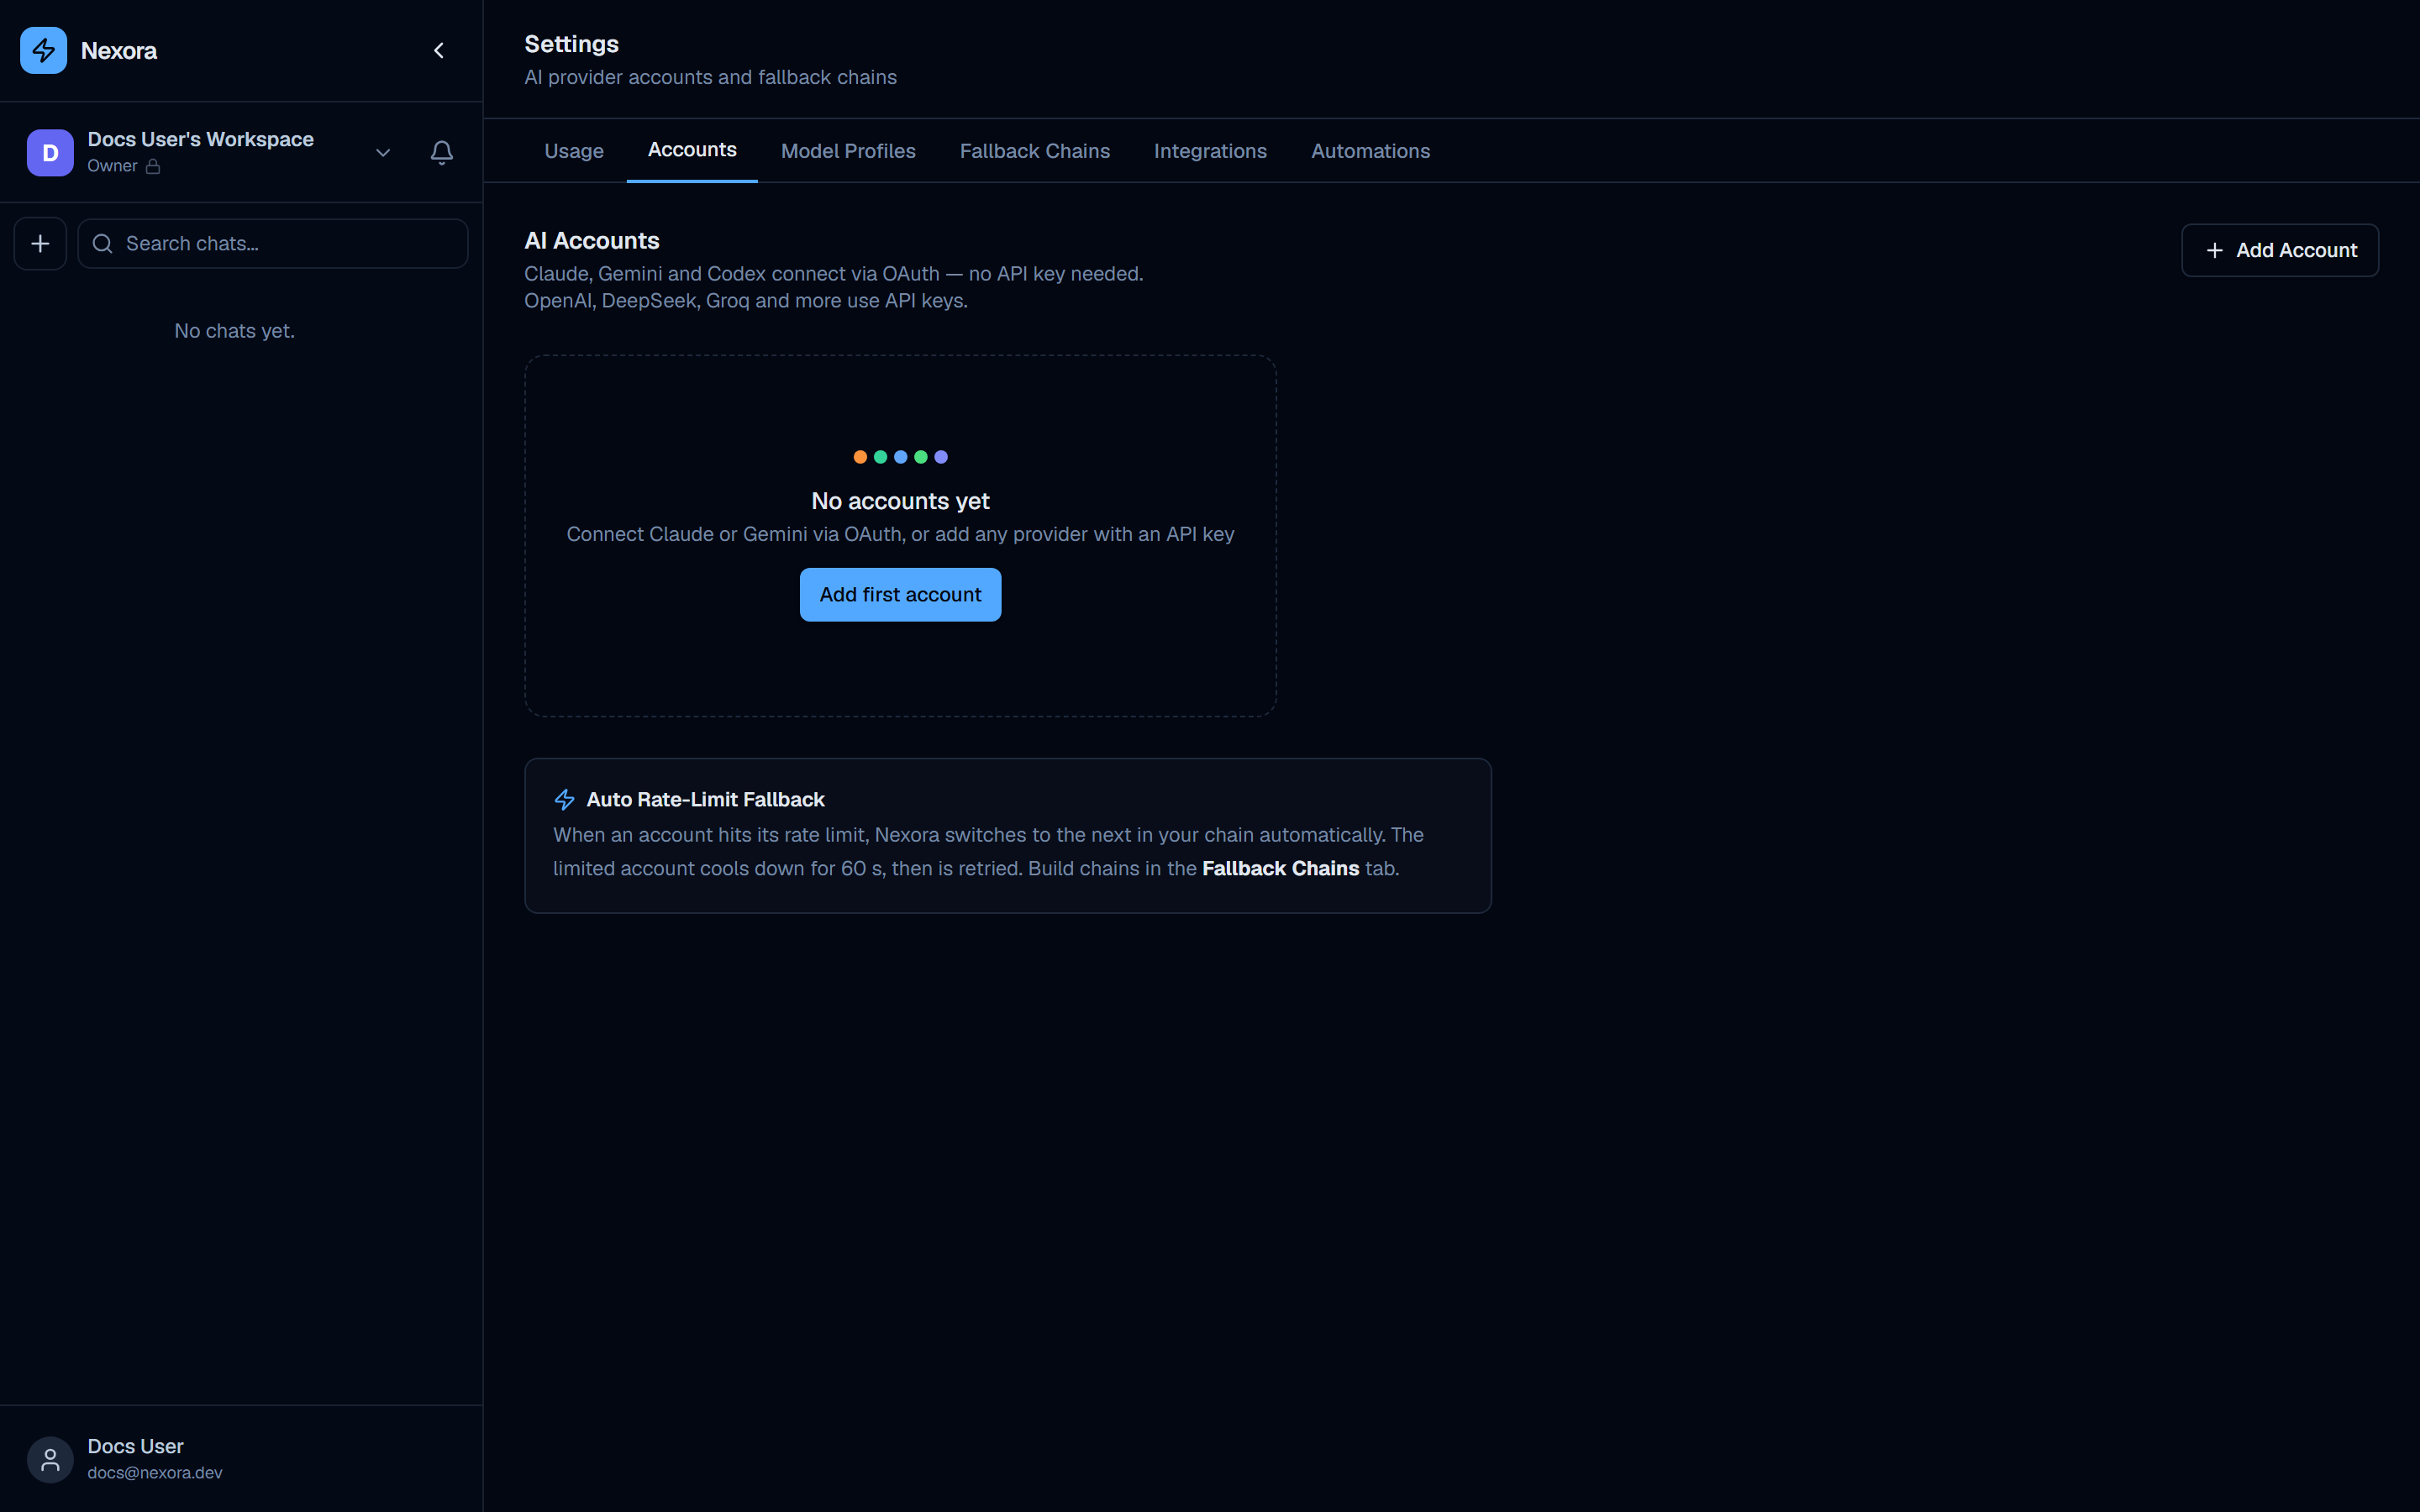
Accounts tab
The Accounts tab is where you connect AI providers. Nexora supports both OAuth-based providers and API-key providers.
Header
The tab header reads:
AI Accounts Claude, Gemini and Codex connect via OAuth — no API key needed. OpenAI, DeepSeek, Groq and more use API keys.
An Add Account button sits in the top-right corner of the tab.
Empty state
When no accounts are configured, the tab shows:
- Colorful provider logo dots (visual indicator of supported providers)
- “No accounts yet” heading
- “Connect Claude or Gemini via OAuth, or add any provider with an API key” subtitle
- “Add first account” button (equivalent to the Add Account button in the header)
Auto Rate-Limit Fallback info card
Regardless of whether accounts exist, an informational card is shown:
Auto Rate-Limit Fallback When an account hits its rate limit, Nexora switches to the next in your chain automatically. The limited account cools down for 60 s, then is retried. Build chains in the Fallback Chains tab.
Add Account modal
Clicking Add Account or Add first account opens the Add Account modal.
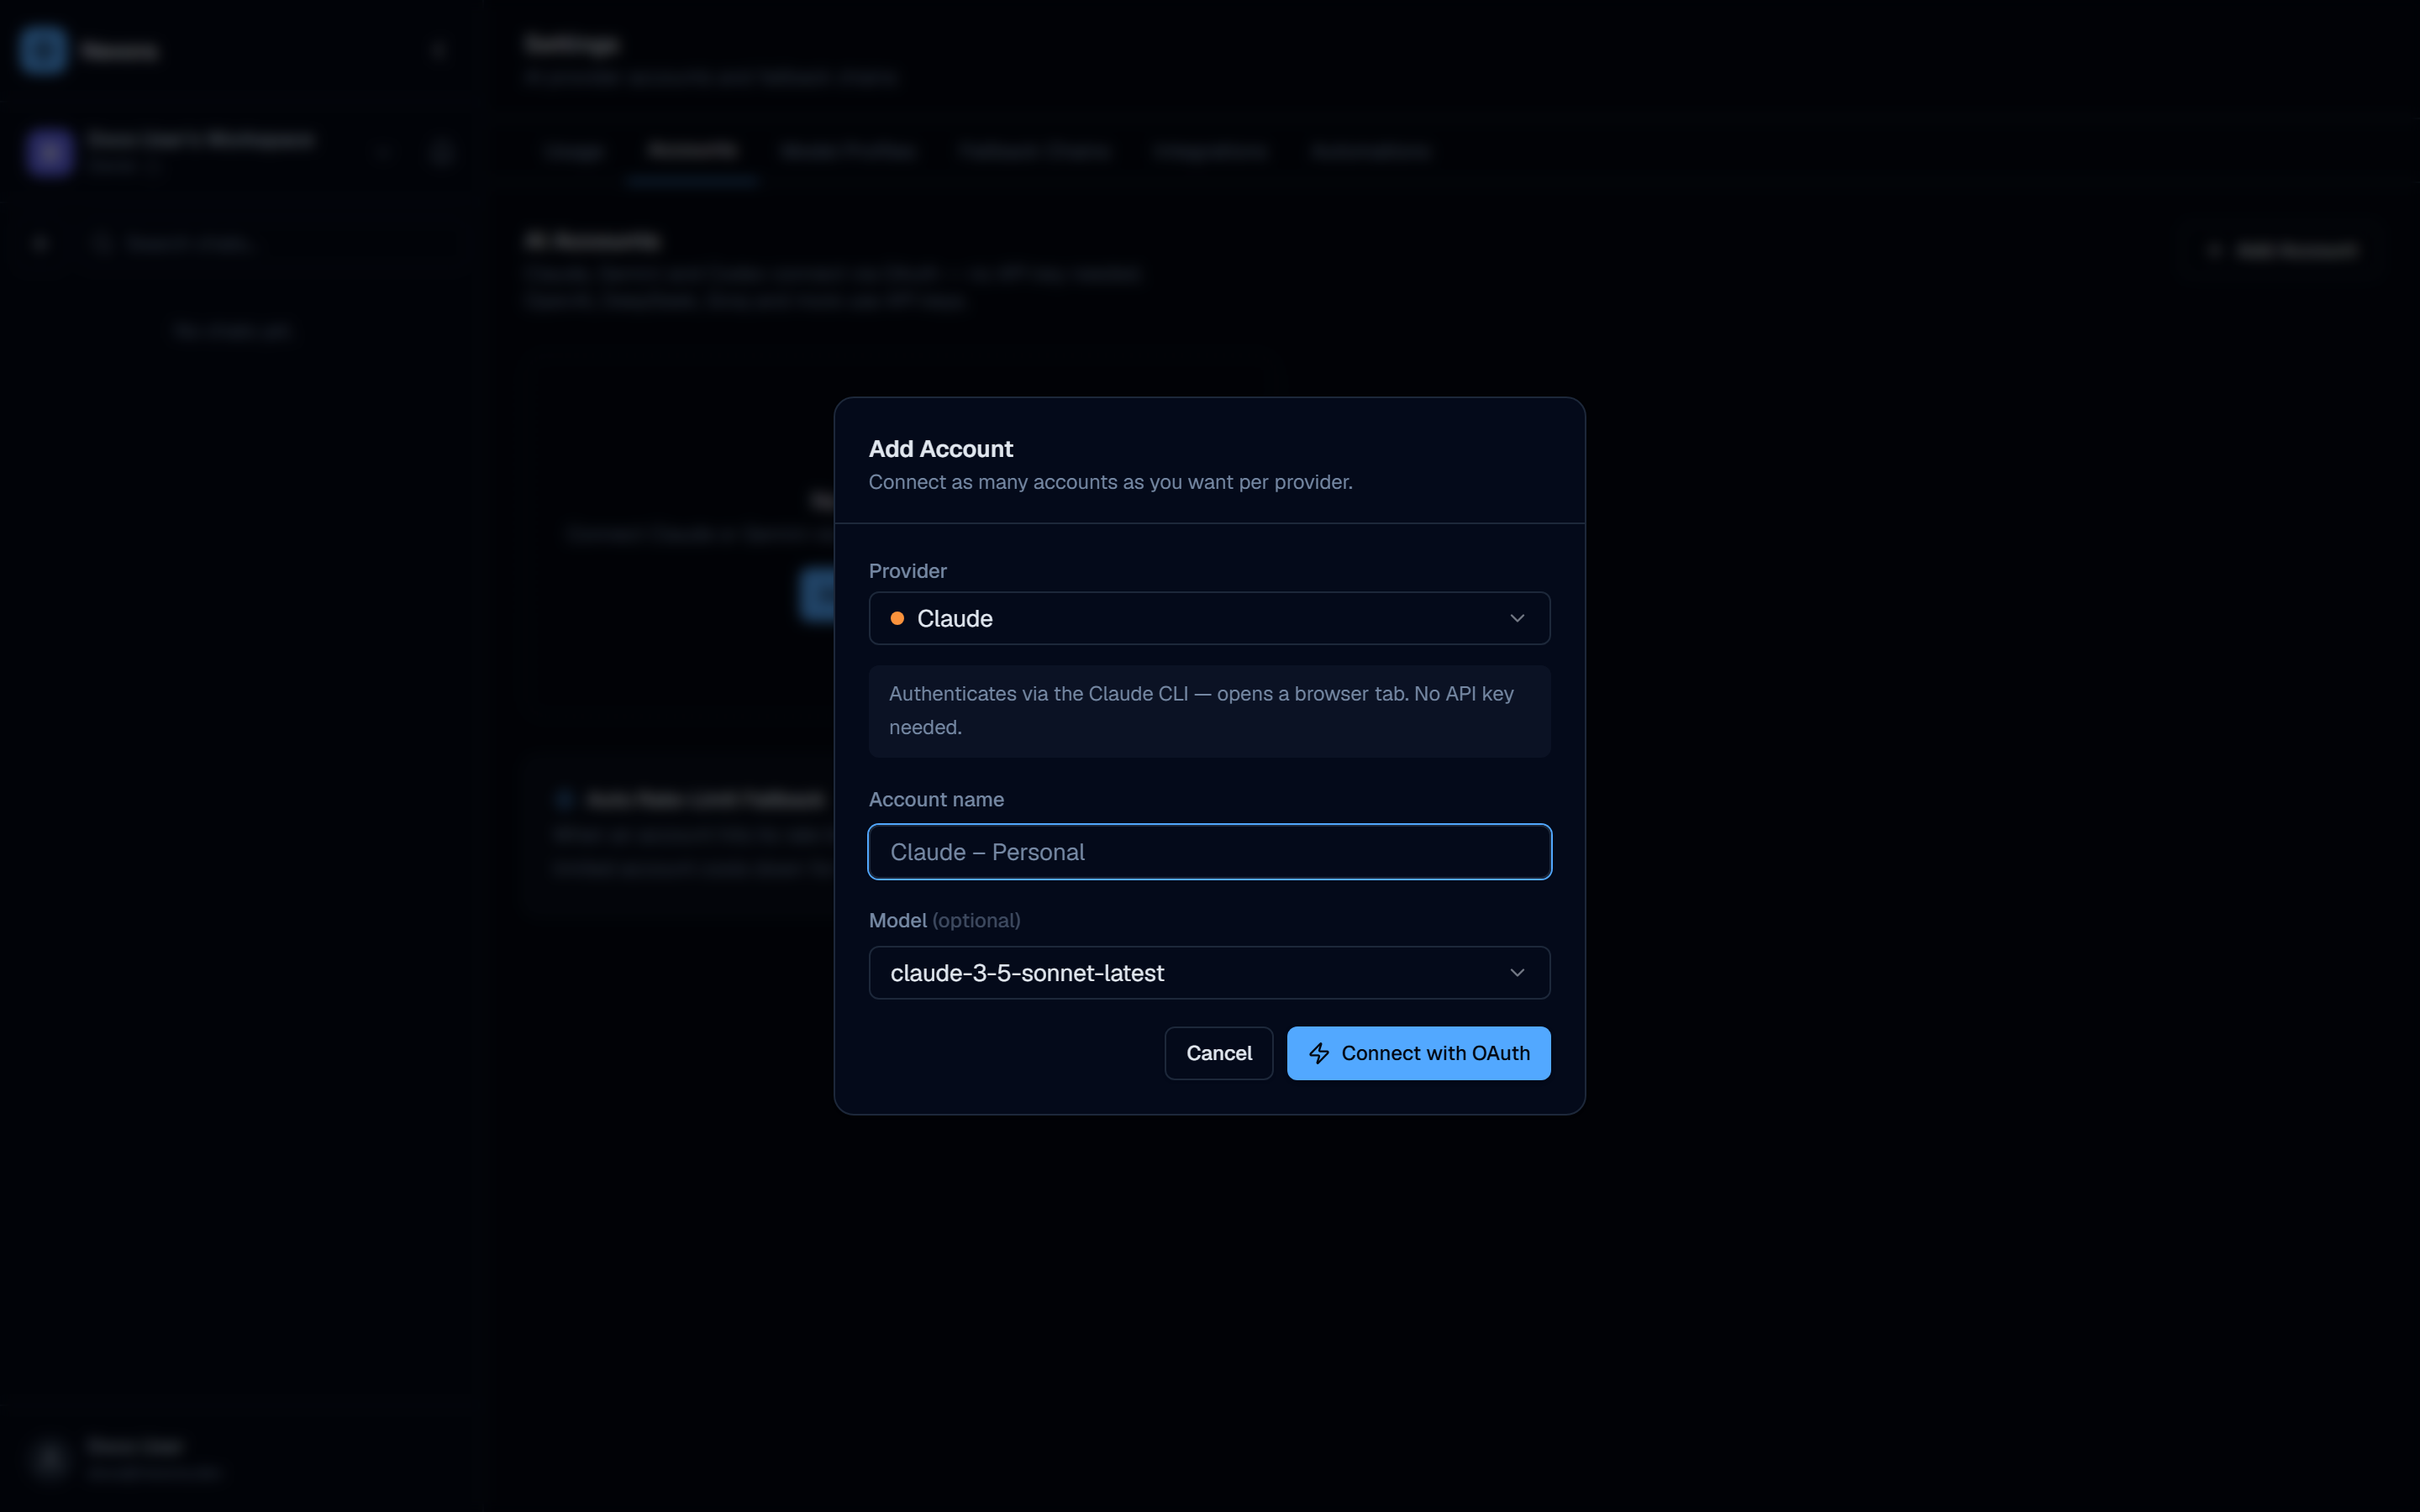
The modal contains a Provider dropdown that defaults to Claude (shown with an orange dot).
OAuth providers (Claude, Gemini)
For Claude and other OAuth providers, the modal shows:
- An info box: “Authenticates via the Claude CLI — opens a browser tab. No API key needed.”
- Account name field (default: “Claude – Personal”) — an editable label to identify this account
- Model dropdown (default:
claude-3-5-sonnet-latest) — the default model to use with this account - Connect with OAuth button — clicking this opens a browser tab to complete the OAuth authorization flow
After authorizing in the browser, the modal closes and the account appears in the accounts list.
Model Profiles tab
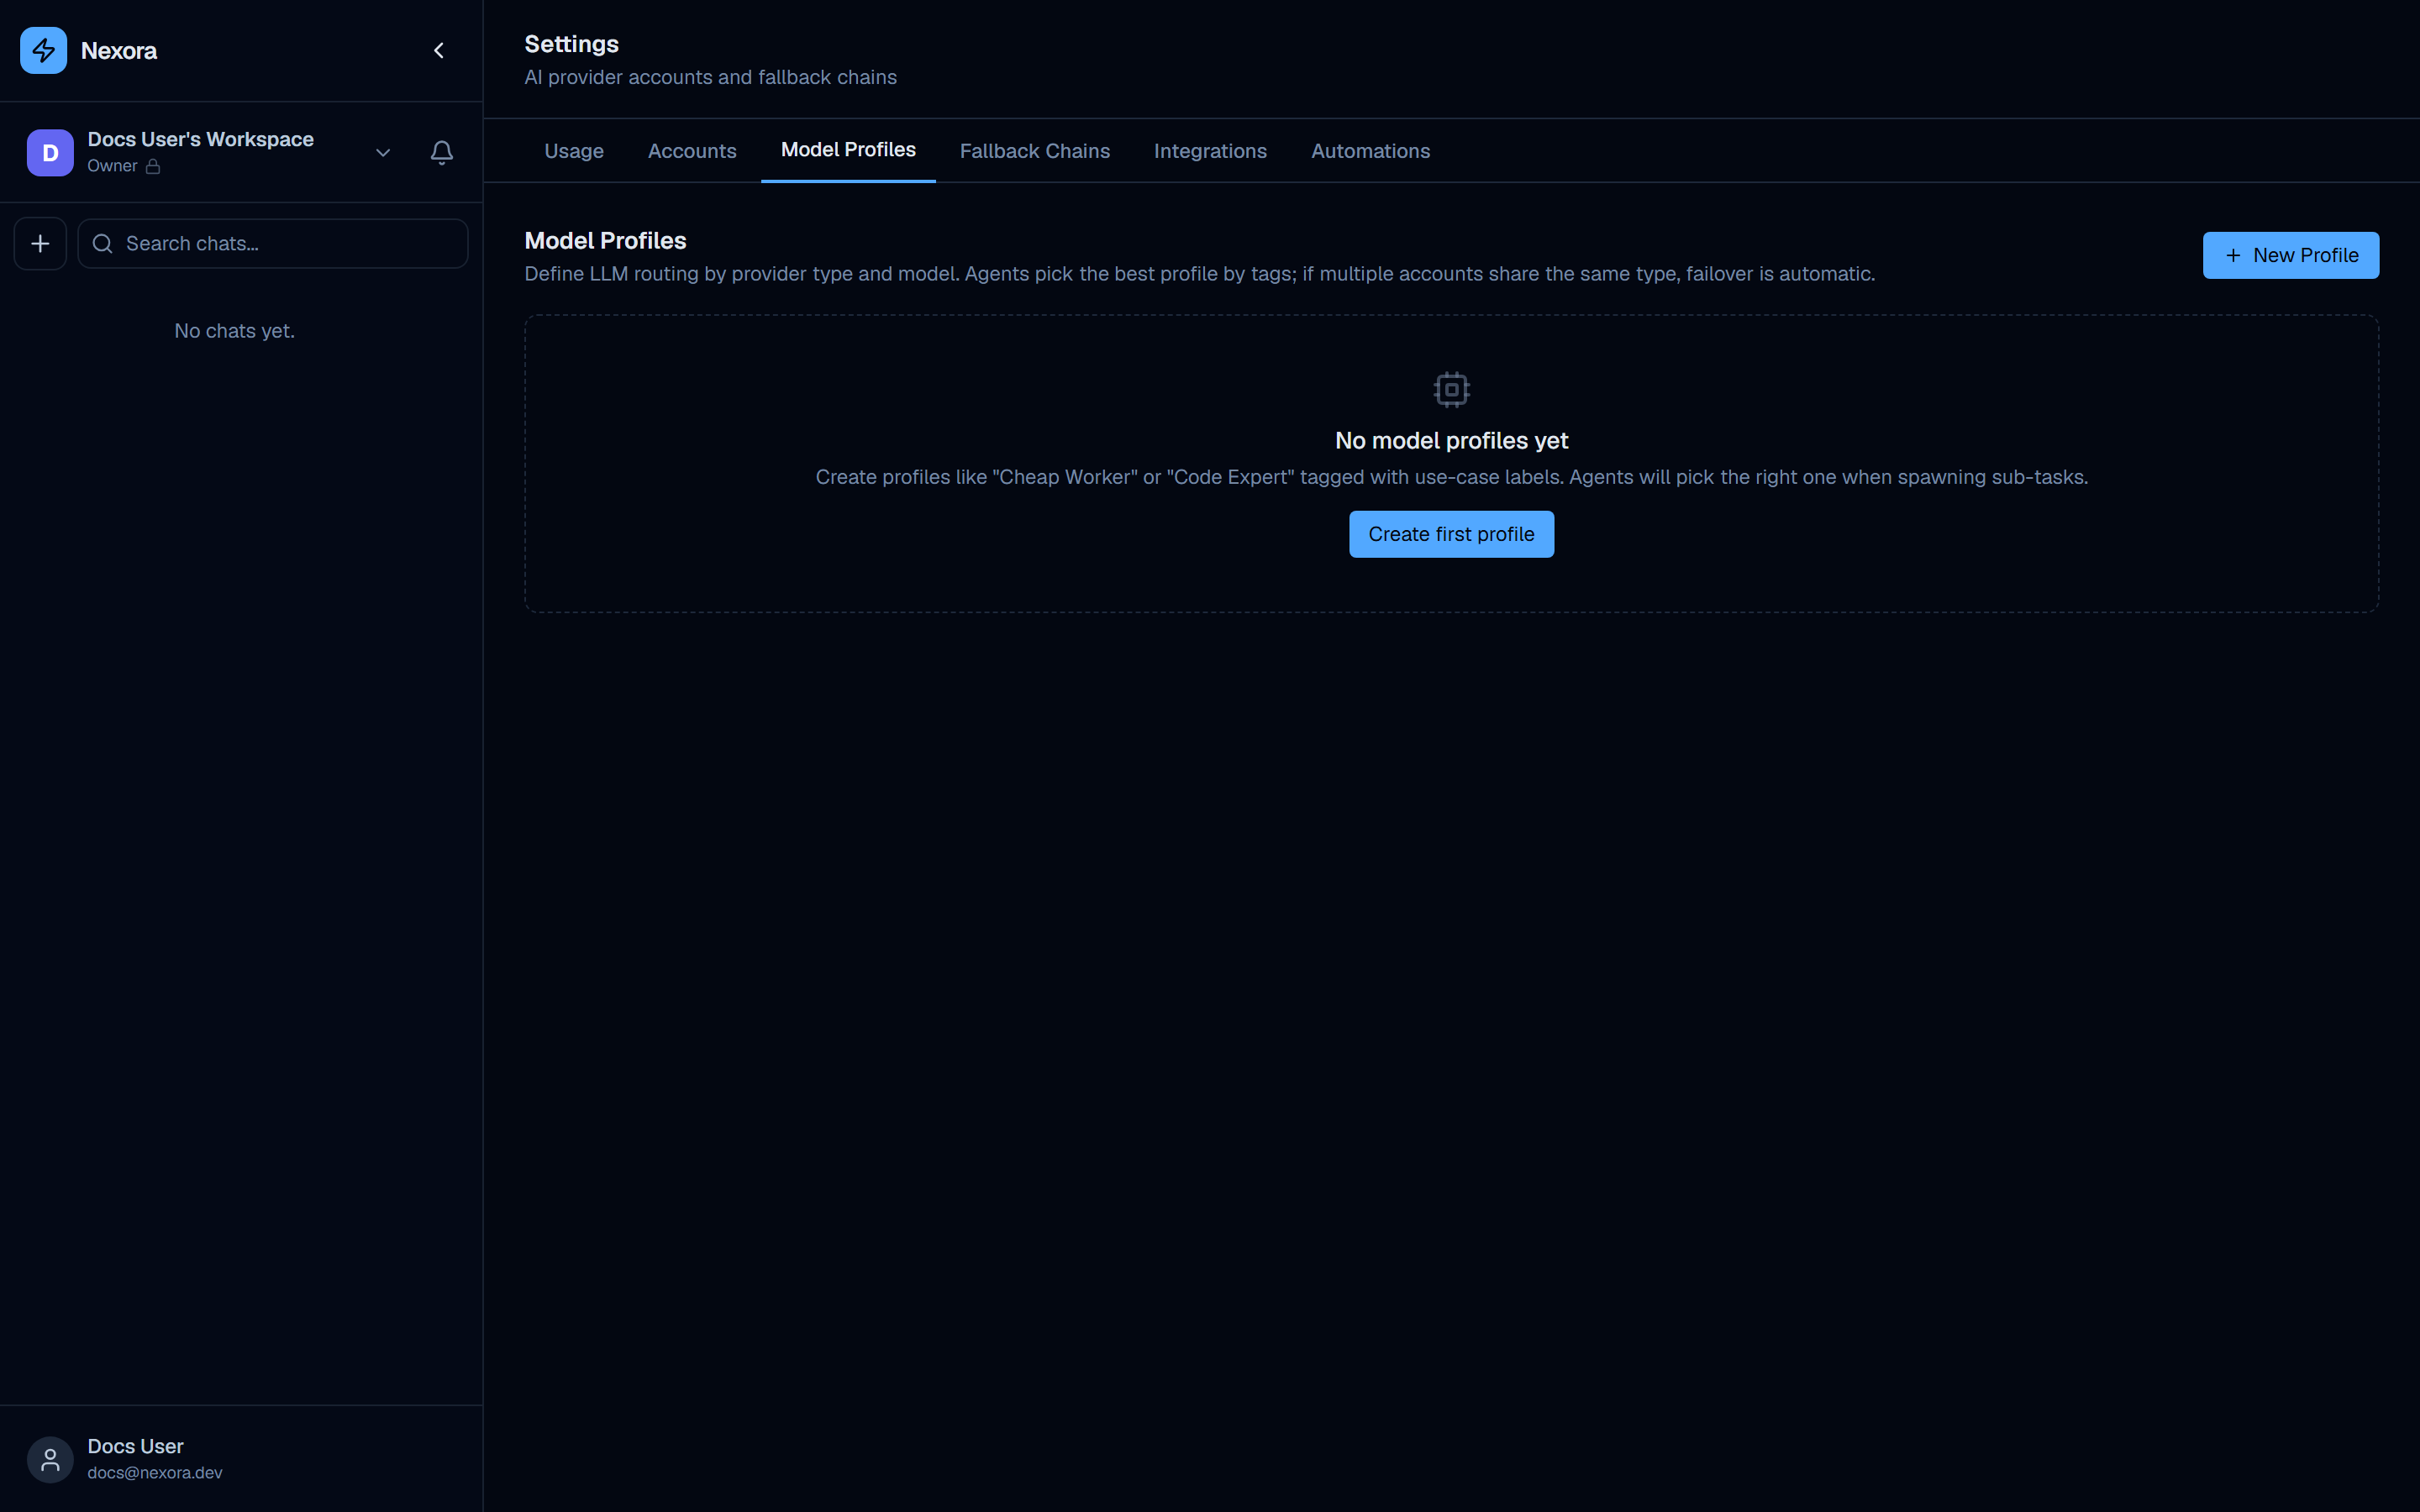
Model Profiles let you define named LLM configurations that can be assigned to agents. A profile captures:
- A name (e.g. “Fast”, “Balanced”, “Powerful”)
- A speed tier — controls the trade-off between response latency and depth
- A model — the specific LLM model to use
- A temperature — the sampling temperature (higher = more creative, lower = more deterministic)
Profiles are referenced by agents in their configuration. Changing a profile’s settings immediately affects all agents using that profile.
Fallback Chains tab
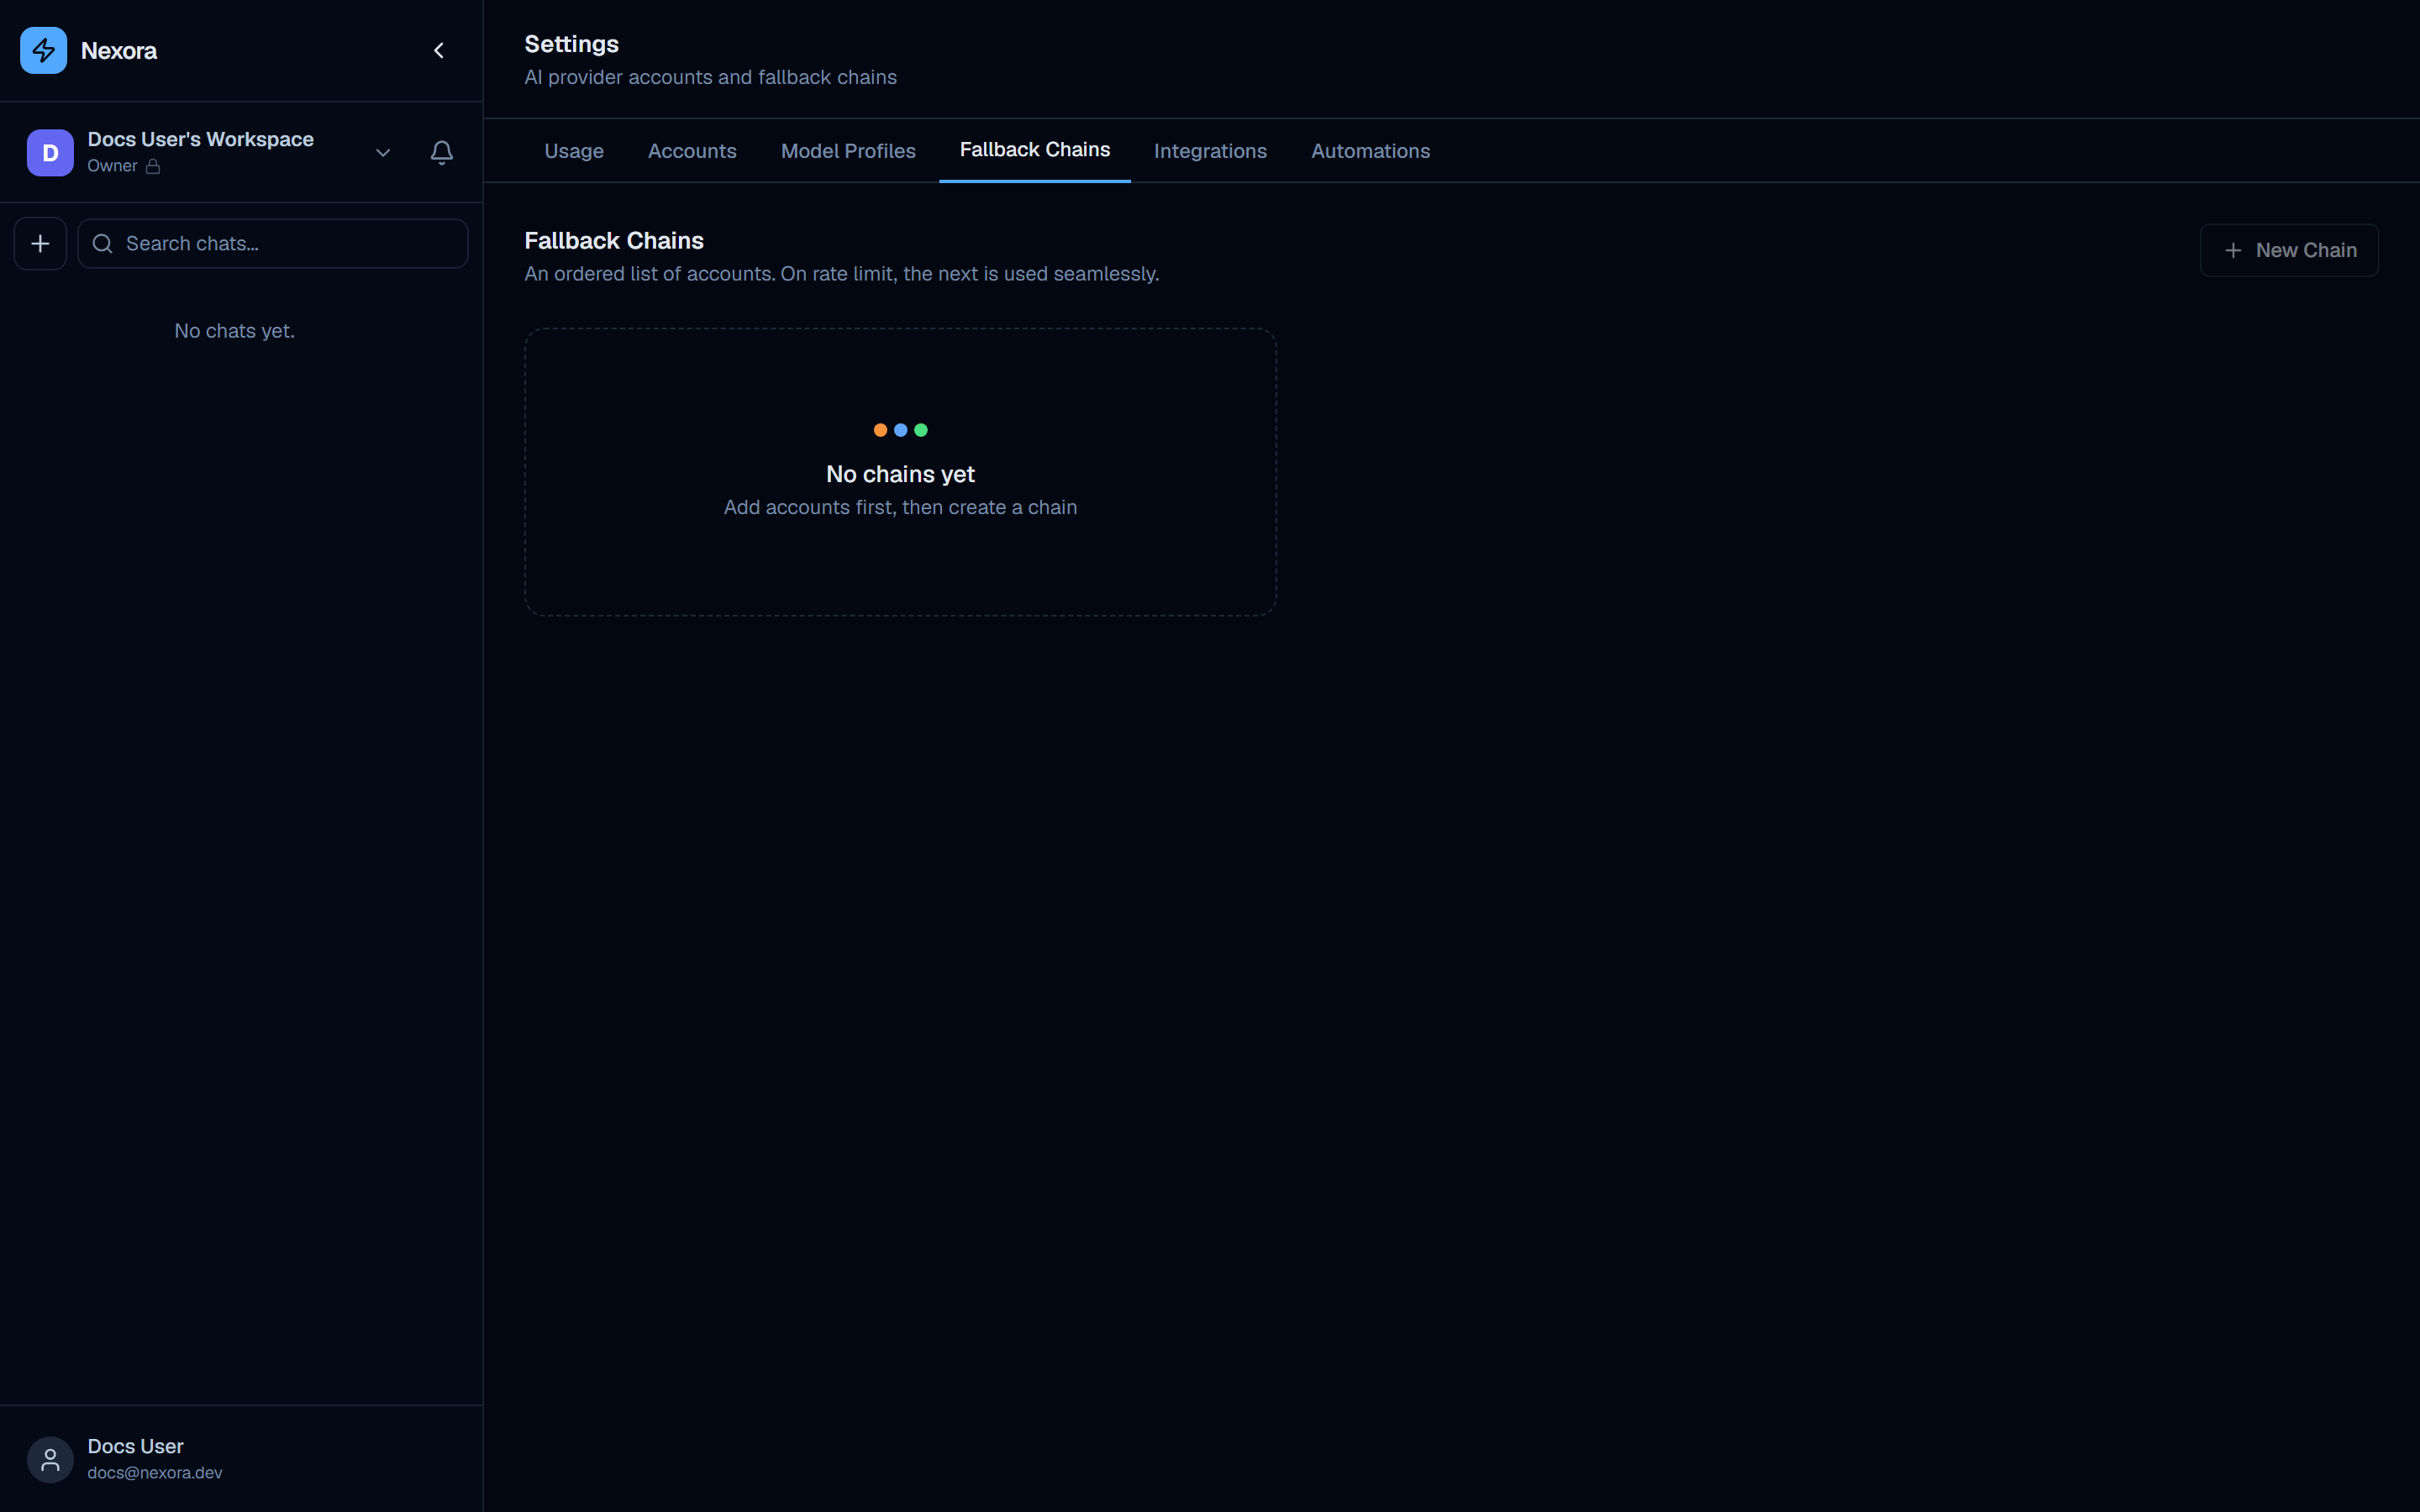
Fallback Chains define the order in which Nexora tries provider accounts when a request fails due to rate limiting or provider errors.
How fallback works
- Nexora sends the request to the first account in the chain.
- If that account returns a rate-limit error, Nexora immediately retries with the next account.
- The rate-limited account is placed in a 60-second cooldown. After cooldown it is re-added to the rotation.
- If all accounts are exhausted, the request fails with an error.
Building a chain
- Click Add to chain and select an account from your configured accounts list.
- Drag accounts to reorder them — the topmost account is tried first.
- Click the remove button (×) next to an account to remove it from the chain.
For maximum reliability, add accounts from multiple providers (e.g. Claude + Gemini + OpenAI). This means rate limits on one provider won’t block all requests.
Integrations tab

The Integrations tab connects Nexora to external services that agents can interact with.
| Integration | Purpose |
|---|---|
| GitHub | Read and write repositories, issues, pull requests via the GitHub API |
| GitLab | Read and write repositories, issues, merge requests via the GitLab API |
| Telegram | Connect a Telegram bot token so agents can send and receive Telegram messages. Required for Channels with “External Chat” type |
| SMTP email | Configure an SMTP server so agents can send emails via the email tool |
Each integration card shows:
- The service name and logo
- Current connection status (connected / not connected)
- A Connect or Configure button
Telegram integration must be configured here before you can create a Telegram channel under /channels. The bot token entered here is used by all channels of that type.
Automations tab
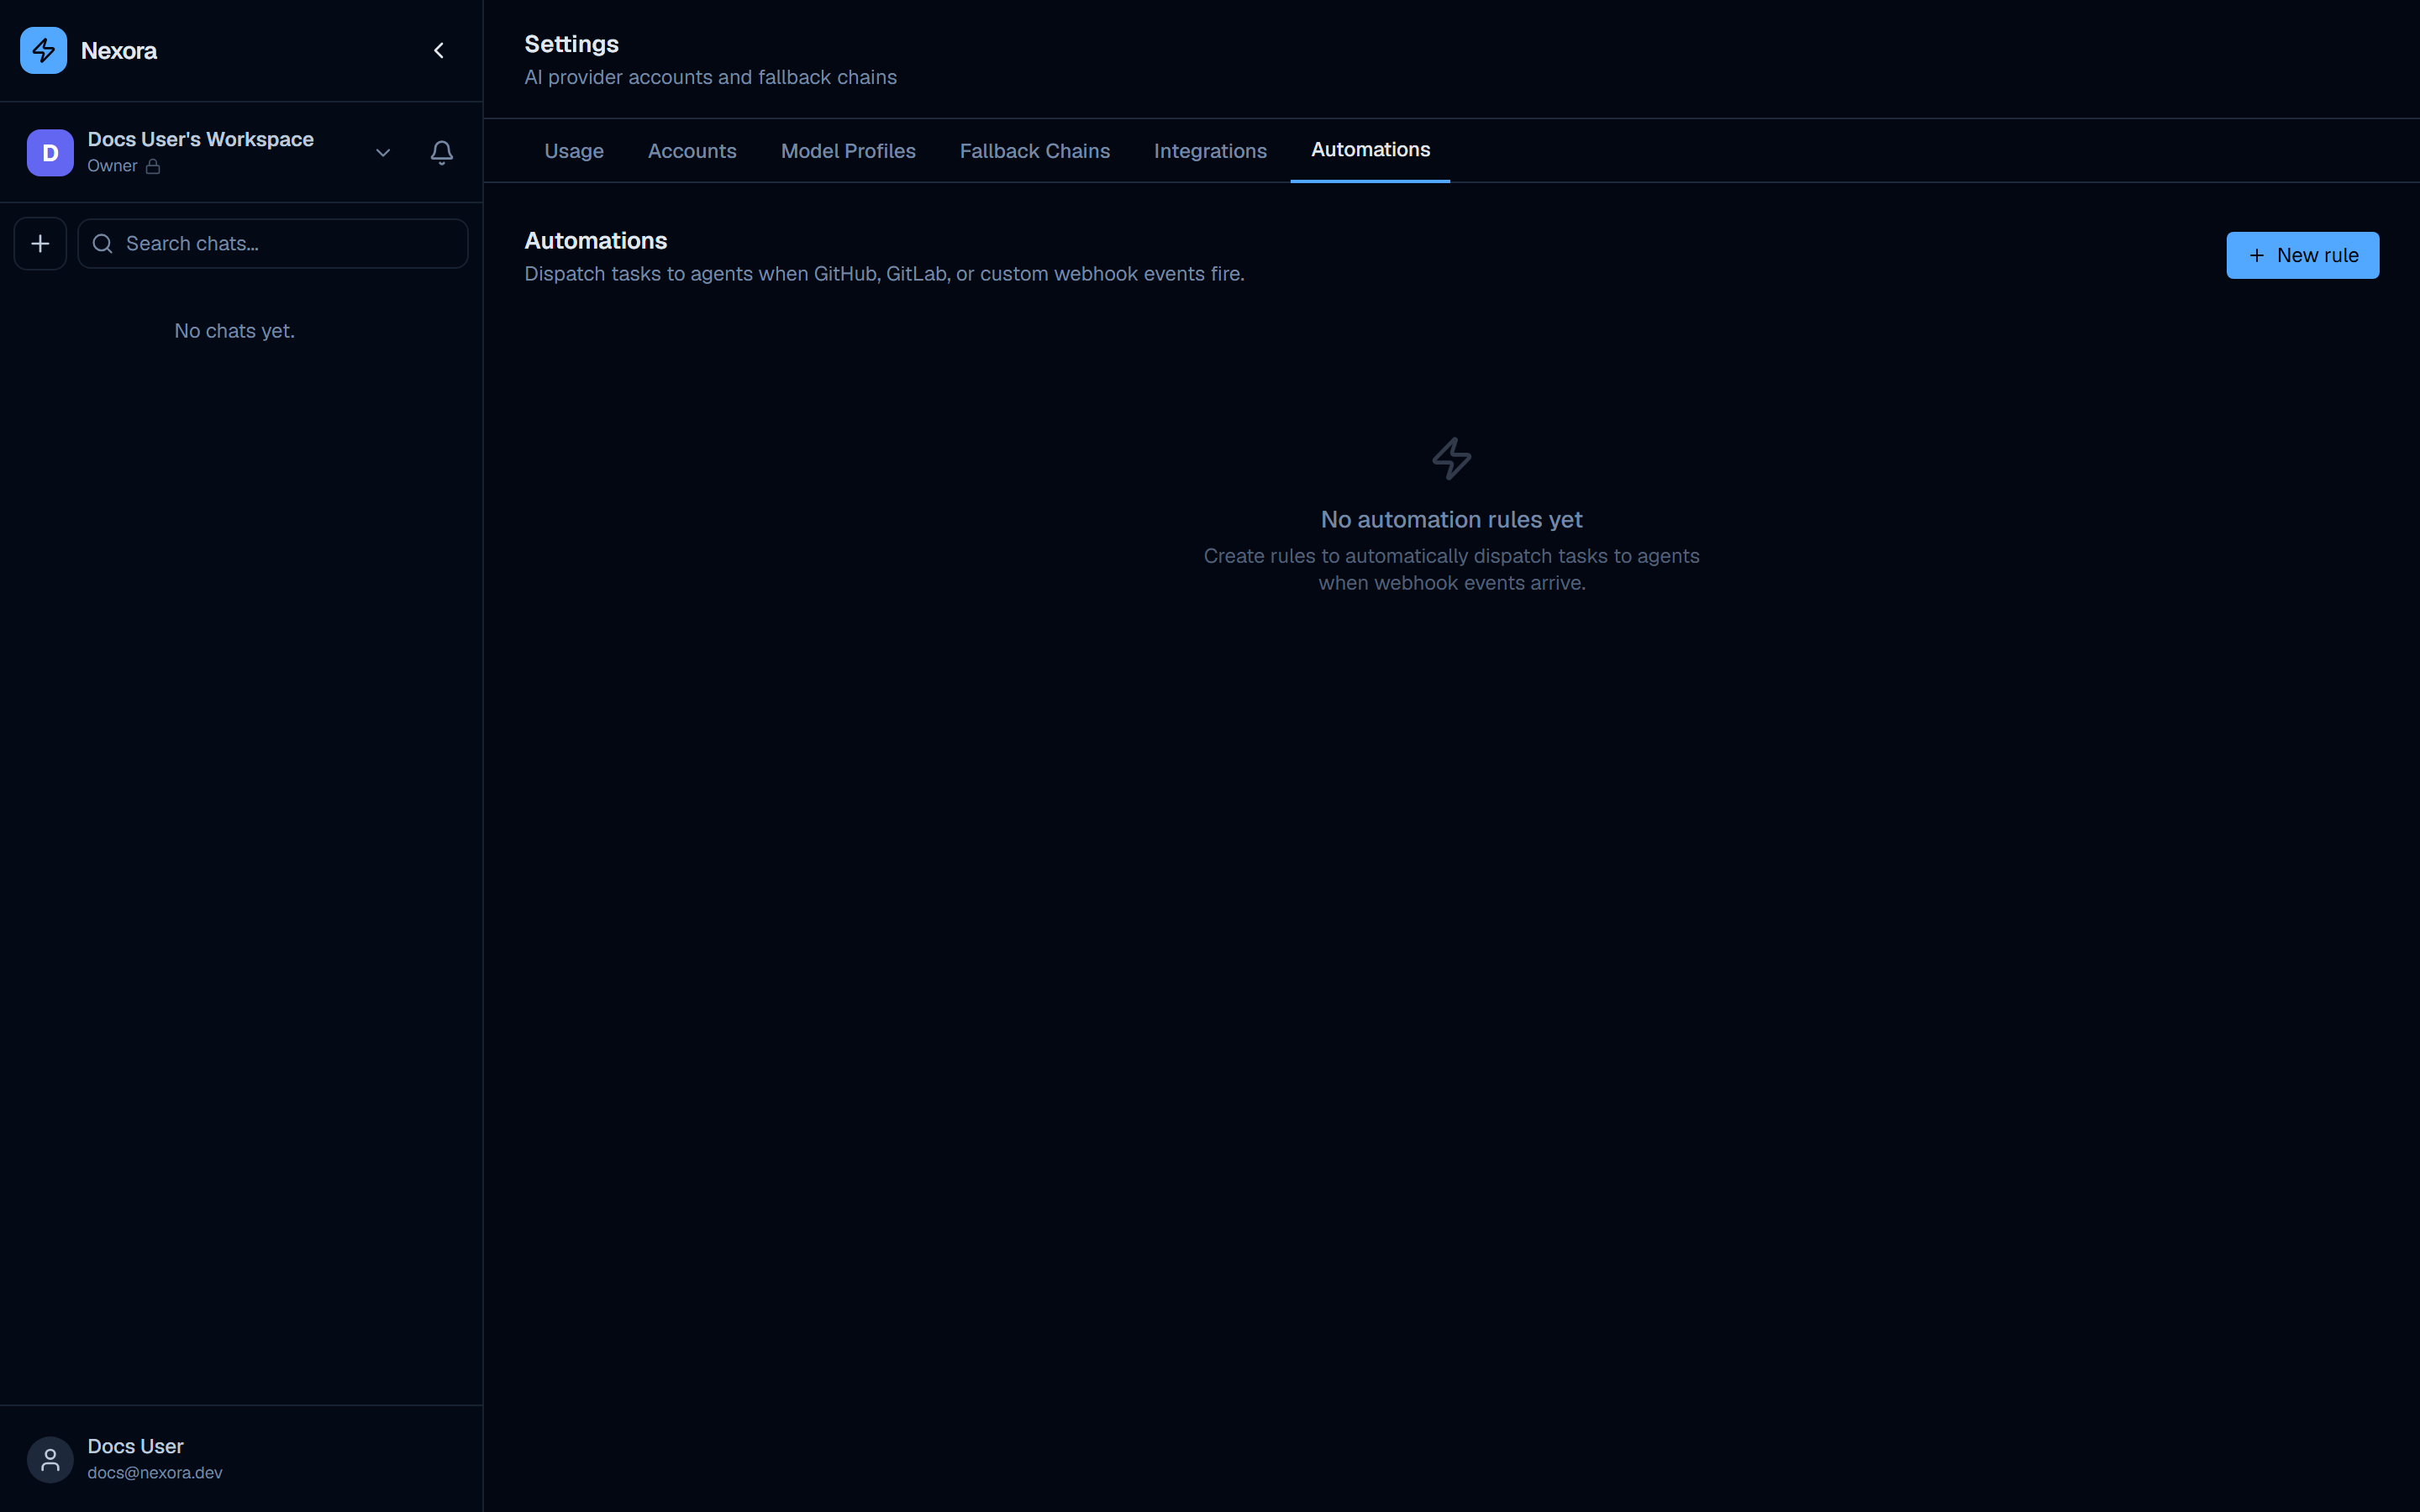
The Automations tab lets you configure rule-based automated behaviors that trigger agents on a schedule or in response to events.
Automation rules define:
- A trigger — what causes the automation to fire (e.g. a schedule, an incoming webhook, a Telegram message matching a pattern)
- An agent — which agent handles the trigger
- Parameters — any additional context or instructions passed to the agent when it fires
For time-based automations, also see /schedules — the Schedules section provides a dedicated interface for managing cron-style scheduled agent runs with full run history.